Friday, June 3, 2016

Painting for Table Top D&D - The Quest Begins

Greetings one and all. The summer has arrived! And I look forward to my first mostly open summer (the Teacher Life!) and the opportunity to feed my hobby bug that has been languishing the past 10 months. Thanks to Reaper and their Bones line, I have been amassing a horde of miniatures, and I am slowly batch painting my collection to make it table-top worthy. I must admit that I have been greatly influenced by a friend of mine, Don Serr, who spoiled me as a Dungeon Master with a vast collection of painted minis. Don is the kind of guy that paints monsters and terrain to meet our weekly gaming needs, and as I bring my own children into role playing, I want to give them the same experience.

With that said, lets begin with some images!

Our first look will be the figures standing in for my family's D&D characters:


Introducing my son Aidan's first character, the Halfling Cleric - Sam Burrows.


Next, we have my son Tristan's Dwarf Druid - Granite Underhill


Let me tell you that finding a Dwarf figure that is not covered in metal armor is a difficulty, but thankfully Tristan found the half naked dwarf rather funny!


Tristan wanted his dwarf to be more exotic (as a druid, his animal companion is a Velociraptor!) therefore I went with Tiger skins.


Finishing the family team, my wife Jennifer is playing the Elven Paladin, the Lady Amalthea:


I like how she turned out with the gold and teals.


I like how the shield turned out, and I tried my hand at some elven runes as well.

And here is the family photo of the team together!


So here is the start of our merry band, but I had a character painting bug, so I decided to go for a few more. Our first addition is a character played by one of my students in a lunchtime Pathfinder Game that I started. Introducing the Necromancer - Gwenore.


Not too sure about the face... and the sculpt is old, so the hand is a little blocky, but it will due. Not quite finished, I'd like to add some source lighting coming from her wand and outstretched hand, but this will have to be a task for later.


The next figure is another student character, the Tiefling "Aether"


This was my first attempt at source lighting, from the top of the staff and the ends of his outstretched fingers. The figure is from the Bones, and I have to say that I really like the details on this sculpt!


The next figure is a Reaper Bones Dark Elf Warrior that filled in as the character "Gelan'dir" in my Lunch Pathfinder game.


Not sure what I feel about the Reaper Dark Elves... very spindly and wrapped in rags. I vacillate between like and loathe, but I will continue to paint the figures that I have.


I do like the tattered cloak from behind.

With characters out of the way, the lion share of my painting quest is going to involve painting hordes of rank and file minions, monsters, and creatures. Again, I want to stress that as I am attempting to build a Role-Playing miniature collection from scratch, most of the paint jobs will be "Down and Dirty and Table-Top Worthy"... we will save the greater detail for bosses.

So, lets start with a beginning fantasy RPG standard... Rats! Thats right, even on the PC, I remember killing rats at the beginning of Balder's Gate


The rats are Reaper Bones figures, but for small creatures like these, I think I appreciate the Bones line even more. The detail is not as sharp as one would find on metal figures, but the price is perfect. The Bones line is really encouraging me to pick up all the figures found in our adventures.. building a collection slowly, without absolutely killing my pocket book.


And aside from Giant Rats, of course we need rat swarms! The detail is not the sharpest, and my main concern is the gloss from the cheap varnish... I will need to give these a second spray with a matte finish to take that away.


Aside from rats, I figured what could be more iconic than skeletons!


Again, real quick paint jobs... base coat, apply wash, and call it good. I thought about going through and offering a final dry brush, however they will definitely do for now. You can see that the Bones material can be very bendy... I need to hit the Skeleton on the right with a flame and straighten his spear.


After the spear wielding skeletons, we have a few armed with swords and boards.


And finally, to fully harass my players, skeleton archers:


Taken together they are a fairly impressive horde! Better make sure to carry a bludgeoning weapon!


Well folks, I think this is all for the time being. I am glad to have a chance to once more engage in the miniature painting hobby, and I look forward to updating the page more regularly this summer. 

I am also excited to announce that my boys, Aidan and Tristan have started painting minis as well, and I think I will feature some of their work in future posts. Coming next I have some more classic fantasy humanoids to share - Kobolds and Gnolls. 

Until them, good luck to all of you in your painting and gaming endeavors!

Thursday, November 29, 2012

Sorcerous Portal


Greetings folks… sure, shock and surprise, I am alive, and in fact posting. The horrible truth is that I have been working on plenty of hobby related tasks, but I have been terrible completing projects, and even worse at taking pictures. What I have to share with you all is a quick piece of terrain I threw together over the past three days. I am playing in a Warhammer Fantasy Escalation League, and one of the really cool features of the campaign is that everything is achievement based (instead of solely win/lose). Players accrue achievements but building unique armies with various restrictions, pulling off feats on the game table, and engaging in the hobby side of the game. There are achievements for conversion work, having your army painted by the last Friday of the month, creating a unit filler each month, and finally for creating a piece of terrain.

I had every intention of achieving all of those milestones this month, but it simply didn’t happen. Instead I am staring down five half way finished projects, and I realized that I would earn no extra achievements… unless I could find some focus.

Enter terrain making. As I have mentioned before, I have gotten into casting with Hirst Arts molds. Sadly I have spent the last three months out of Hydrostone, but that situation has changed. A family trip down to Sacramento (Alpha Fired Pottery Supplies) and I am happily sitting on 150lbs of the precious gypsum based material. Upon returning home, casting commenced with great gusto, and I was averaging 5 casts of 5-6 molds each time per day. My collection of building bits grows.
Now staring down the looming deadline of the last Friday of the month, I latched on to the idea of a terrain piece as a last result to pick up an achievement. Since the latest edition of Warhammer Fantasy was released, I have wanted to build at least one piece of each special terrain mentioned in the big red book. To that end, I started looking at what cast pieces I had, and what terrain features we always seem to be missing a piece for. I settled on the Sorcerous Portal.

My initial plans for the piece, and what it evolved into are very different, and I have to admit that it is one of the things that I love so much about the Hirst Arts bricks. You casts hundreds of blocks, looking at some of the pieces and wondering “when the heck will I ever use that piece…let alone 20?” Then you start playing around, dry fitting pieces, and you learn that the obscure and scorned brick suddenly become integral to your plans.

I decided to give the piece a quick desert paint job to go along with the army that I am playing for the Escalation League, my Knights Templar Bretonnians. I will hopefully be posting some images of the work that I have done on that force in the near future. But until next time, good luck, and get creative!

Sunday, July 22, 2012

Bastion of the Templar

Alright folks, more of a teaser this time. When Warhammer 40k 6th Edition first released, I remember Travis (I believe) asking folks what they were going to do to create Bastions and other terrain pieces for their armies. I know that he was specifically thinking of non-Imperium and xenos, but I felt that my Black Templar needed something special as well.

This is what I have come up with for my chosen of the Emperor.

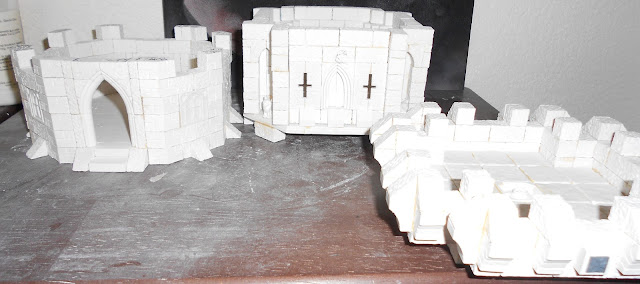
As you can see, it is a structure with two floors and a battlement on top. All of the floors are removable, so models can be placed inside if I like (though aside from the battlement, I do not have to with the new rules.)

The basic structure has been built with Hirst Arts blocks, and other little bits. All that remains is to add the weaponry... namely the four heavy bolters and the Quad Gun.

As Templar do not have official air power at the moment, this will be one part of my anti-air defense system. For 125pts, the structure can hold two squads (1 inside the building, and 1 on the battlement), provides armor 14 protection, and has 5 weapons to hide my anti-air weapon from destroyed results.

Now I just need to get this finished...along side all of the other final projects... for this weekend. Norcon approaches!

Friday, July 20, 2012

Full Steam Ahead!


That’s right, slow but still here, my lack of posts does not stem from a lack of hobbying.. quite the opposite.. I just wish that I had a photographer to hang around and snap photos while I work… It would be much easier! With Norcon (our Northern California Wargaming Convention) just around the corner, I have been spending every possible moment painting models and building terrain for the upcoming tournaments and games. I realized that I had to post something to show you all what I have been busily working on, so here is a peek:

Dystopian War terrain!

That’s right, with a few games under our belts in public, I have grown tired of playing with scraps of miss-matched flotsam that myself and Gramut pretend are islands. Therefore, I present the following:

Based on thin MDF Board, as using flock, clump foliage, sand, balsa wood for the buildings, plaster, lava rock, bark, and foam core I now have four decent sized islands to be proud of.

I also have used model railroad plaster molds to create the smaller rocky islands scattered about in the pictures (purchased at our local RC Hobbies and More).

Sure, I need about three more larger islands to properly outfit a four by six foot table, but that will have to wait until after Norcon.

Just for interested parties, another major project that I am working on is a Bastion for my Black Templar 40k Army. I do not have images yet, but expect to face it on the field of battle at Norcon!

That’s all for now folks, I hope to see you at Norcon!

Tuesday, June 19, 2012

Turning Japanese


Greetings or perhaps konnichiwa would be more appropriate … it has been a long time since I have updated the ‘ol blog, but I hope to remedy that situation. So without further ado, cue the a-tonal woodwinds and taiko drums, because we are heading into the mysterious East!


It is my turn to wear the “Game Master” mantle in my roleplaying group, and breaking from my traditional venue of 7th Sea, I have traded game systems with Grant (from 2D6) and will be running another favorite from Alderac Entertainment: Legend of the Five Rings.  

For those unfamiliar with the setting, think of game heavily influenced by Feudal Japan and Samurai… but that happily borrows culture, traditions, and stylistic elements from other Asian countries like Korea, China, Thailand, and even the Philippines. It is honestly one of my favorite games, and I am really looking forward to seeing how the players interact with my story!

Legend of the Five Rings (referred to as L5R for the rest of the blog) is not a miniatures based roleplaying game, and aside from a small, easily over looked sidebar, there are few rules that make using miniatures intuitive. However, our gaming group counts many wargamers among its members, and if we can incorporate models and terrain, we would like to do so. Also, I must admit that in our previous campaign, our Game Master Jon (from Retreat Condition)introduced terrain and had us use measuring tapes for the fight scenes… and it was epic! So there is the real reason… like iron sharpens iron (or perhaps it’s just a sick gamer form of keeping up with the “Joneses”), I must now make terrain for a feudal Japanese game.

So here is the start of what I have been working on over the past few weeks. None of the pieces are actually finished… though some are getting close. Still, I’m sure that you have all come to expect that (I do not hide the fact that I have completion issues!) At this point you can see that I am working on terrain for a small Japanese village: and I have two smaller homes, and one slightly larger (for a village headman), two sections of rice paddies, a Torii arch, and a stone courtyard that I will use as a dueling arena.

The buildings are coming along nicely. I used Hirst arts blocks for the foundations, and created the raised floor out of foam core with scored balsa wood. The Walls were built with foam core, detailed with balsa wood, and anchored in place by the balsa wood pillars (that are actually sunk through the floor and are glued to the base of the terrain on the larger building).

From here, I plan to finish painting the buildings, add flocking and foliage (with aquarium plants) and finish the roofs. Because these are peasant buildings, I bought a broom, and will be cutting the bristles and gluing them to a foam core base to make thatched roofs. They will of course be removable so that we can move models around for our games. I also will attempt to make small modular “rice paper walls” that I can set inside the buildings to create different rooms. Of course, we will have to see how this actually works out.

Next, the rice paddies look simple to make, but they were the most time consuming, and it was mainly because I chose an insane method of creating the rice. The trouble was that I liked how it looked… so I had to keep going with the technique. Here is what I did. First, everything is based on MDF board for stability… every terrain piece I make from now on will be made with detail AND durability in mind! I then took thin balsa wood and glued it around the edges, creating a “berm” and when this had dried, I glued sand over it to create the texture. I primed the terrain at this point, and then painted everything (water green, berms brown. Then the “fun” began. Using tweezers, gap-filer glue, and very small pieces that I cut from an aquarium plant, I began to “plant” my rows of rice. Honestly… it took hours! It became a project that I didn’t want to work on, but knew that I had to finish, and it was looking so good as it slowly came together. I began bringing it to my sons swim practice and kung fu classes, getting the work done an hour at a time when I couldn’t be distracted by computers and chores.

Finally finished, I used GW water effects, poured it in, and let it dry for about three days.  At this point all I need to do is add some flock and maybe a few plants to the berms. Again, it took a long time, but I do plan on making three more at this point, all angular but in different shapes so that they can be set up together and still make interesting patterns.

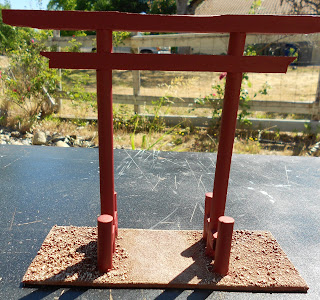
Next you can see the Torii Arch, which is one of my favorite pieces that helps to tie the theme together… It screams “Japanese” and was actually fun to make. Everything was done with round dowels and balsa wood. To finish the base needs to be flocked and plants added. Also, I want to paint the arch a shade or two brighter in red, and if I can find the right piece, I might hang a scroll from the top lintel.  

Then there is my stone courtyard / dueling arena. Honestly, I was playing with spare Hirst Arts blocks, creating patterns, and I saw something that I could use. The piece has been primed grey, and needs a lot of painting love, but it will be ready to soak the blood from one or two Iaijutsu duels in the near future!

Finally, here is a collection of walls that actually started this whole Japanese terrain project in the first place. I want to create a samurai “compound – walls surrounding a few buildings: shrine, dojo, living quarters. These pieces were again built using the Hirst Art blocks. I then glued balsa wood and filled the top portion with spackle to create the “plaster” look. I am still casting the tiles that top the walls, and adding plaster to the corner pieces, but they are coming along nicely. Ultimately I will work on building a working gate, and I am currently torn over whether I should base the pieces on thin MDF or just leave them free standing…  there are advantages to both.

From here, I would like to add some more buildings. I am sketching plans for a temple (picked up some cheap Buddhas is different poses to act as the Rokugani fortunes) and I would love to build a pagoda. I just placed a “father’s day” order for five more Hirst Arts molds, so we shall see what inspiration they give for more projects.

Well, that’s it for the moment. Next post I will take some time to show you some of the models that will be battling on this terrain… that’s right, I have samurai!